Lesson 4: 1582 Tartar Boots (Stacked Leather)

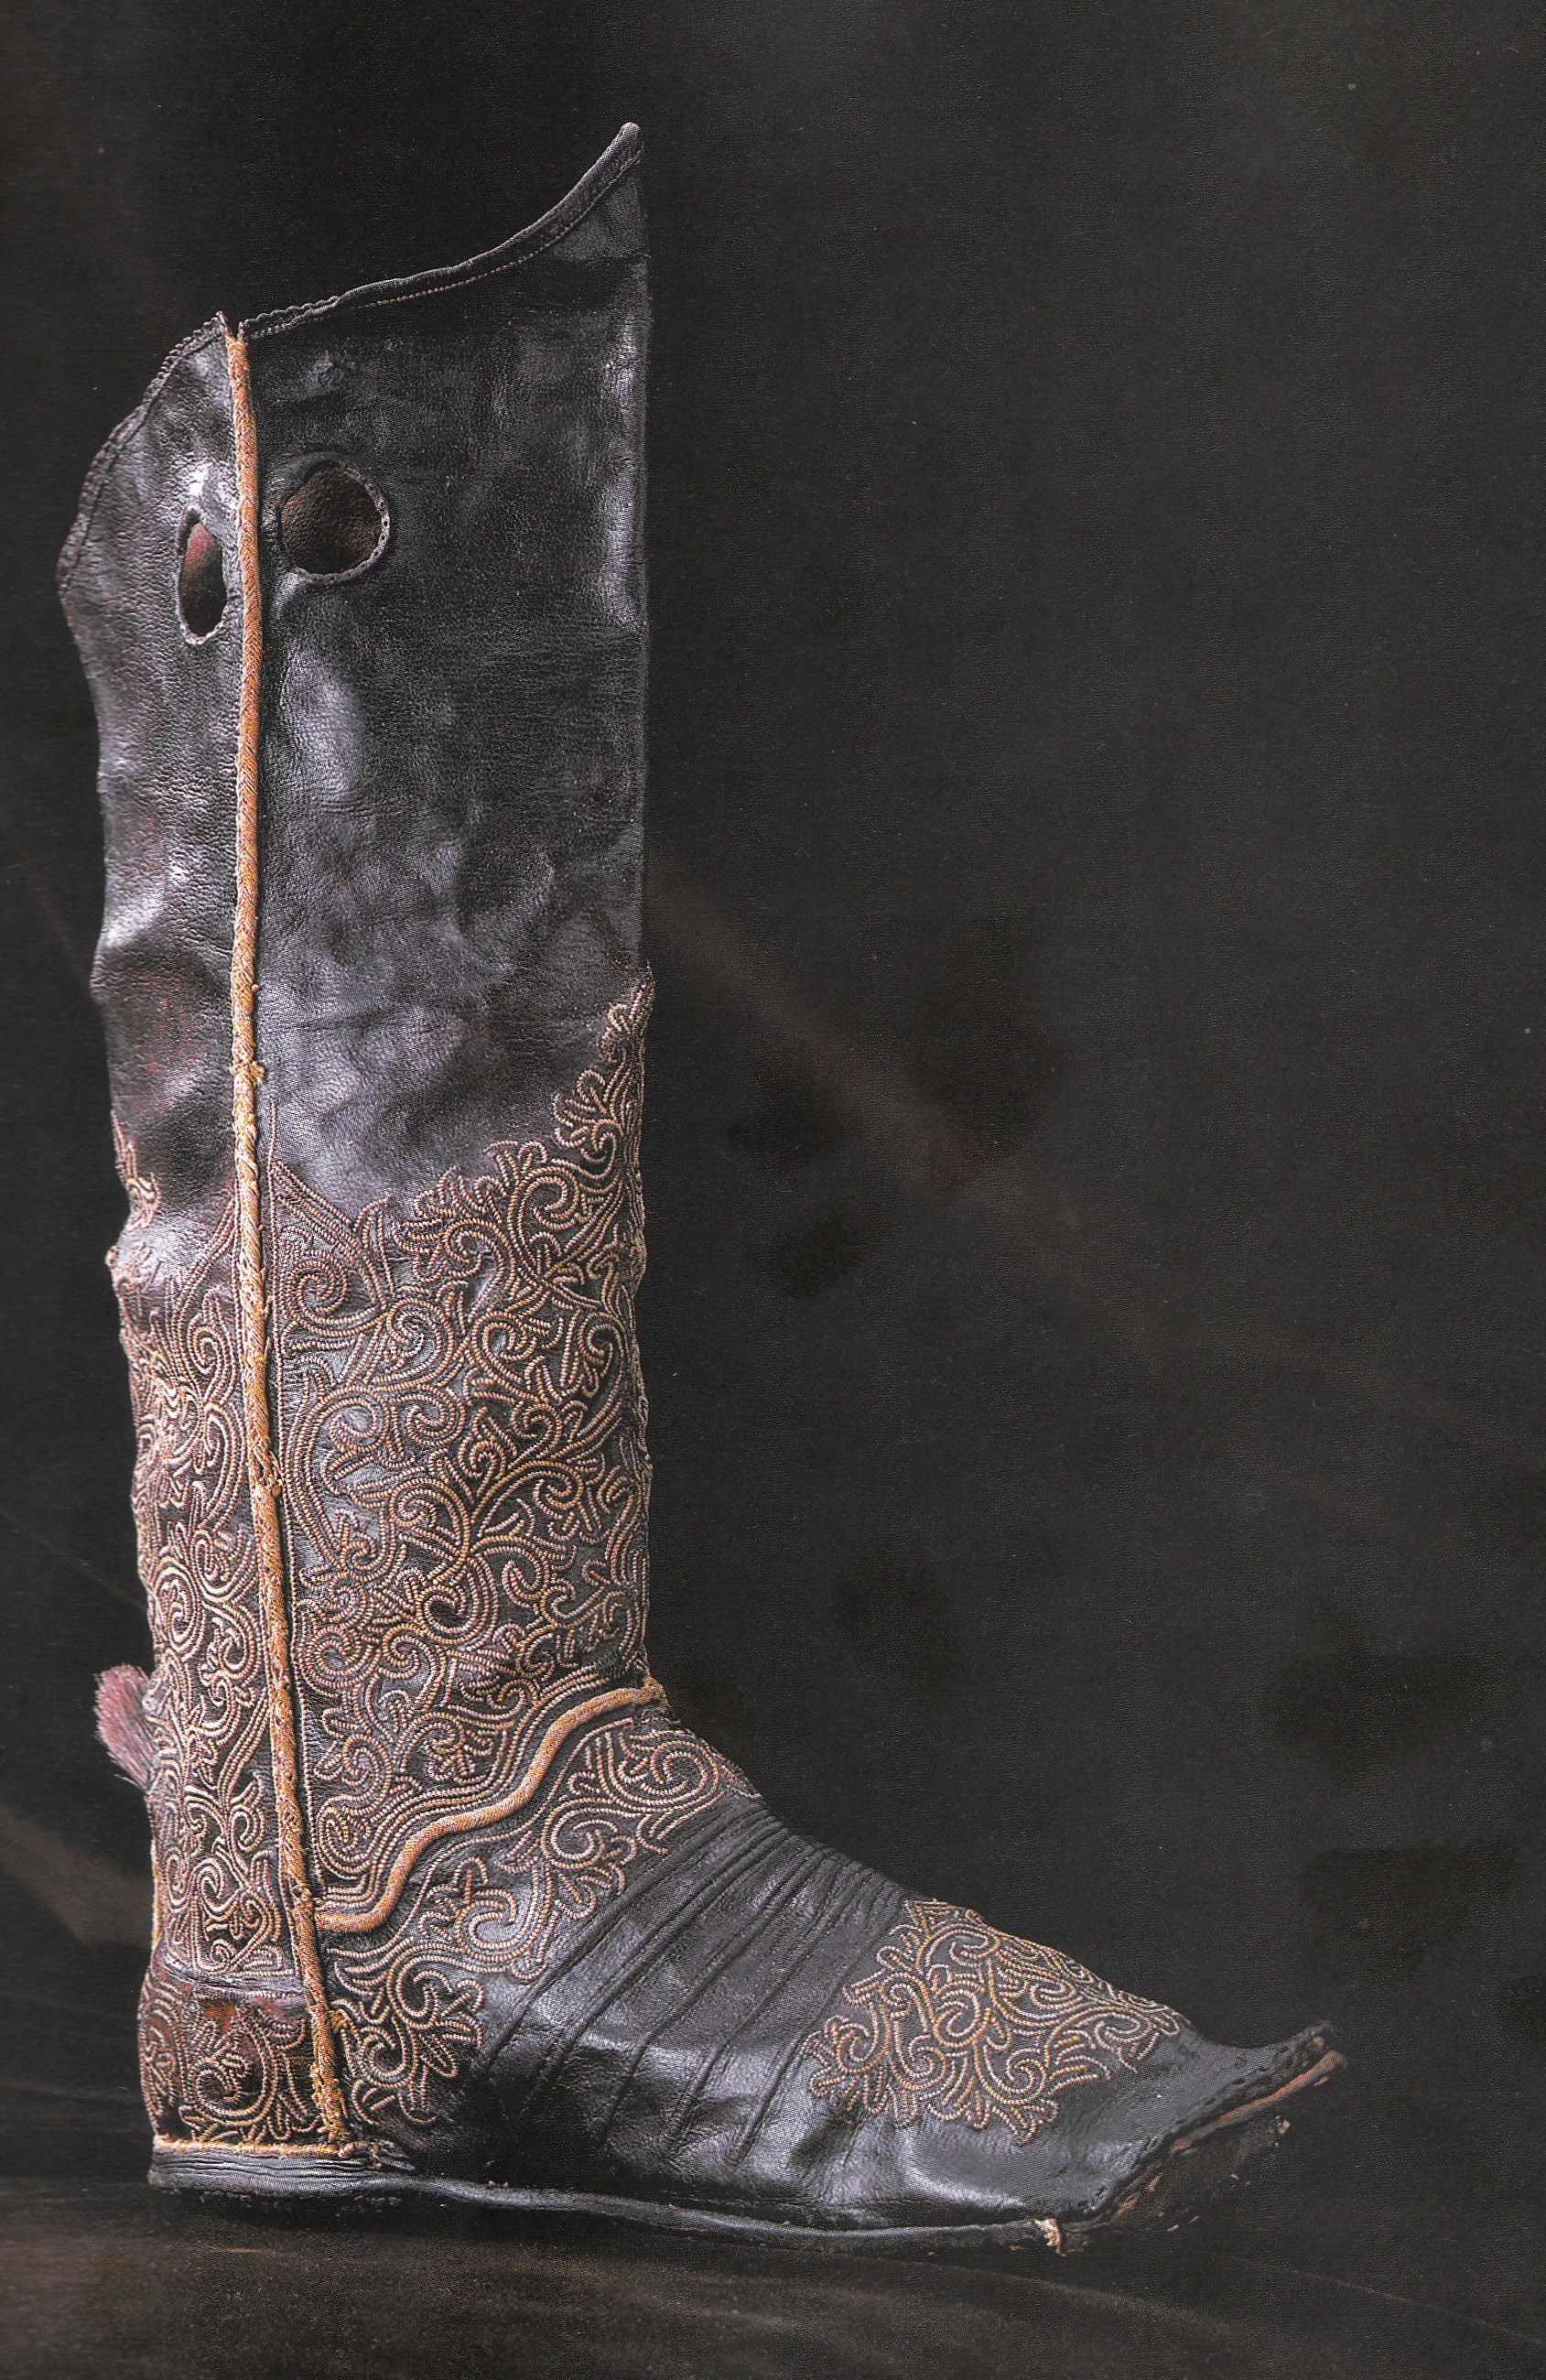
January 6, 2009 - I received a commission to create a pair of Tartar boots dated to 1582, pictured below, which currently reside in the Livrustkammaren museum in Stockhold, Sweeden. This lovely pair of boots is embroidered all over (yes, embroidered, not painted), and has a 4 layer stacked heel, which is the reason for its inclusion on this website. The picture comes from June Swann's "History of Footwear in Norway, Sweden and Finland. Prehistory to 1950," and the relevant pages are pp 94-97. Originally, this boot is thought to have been a present from the Khan of the Crimean Tartars during his visit to the Stockholm at the end of the century (Swann 94).

The boot as it currently exists in the Livrustkammaren museum. This picture comes from Swann's book on page 95. There are *many* interesting things to note about this boot, and I could go on at length. Hm. In fact, I think I will, because it will serve to value the research I've done and help you in your own raised boot construction.

The top of the boot is edged with a small strip of leather, but it is difficult to see exactly how the strip is attached. Possibly both layers of leather are stitched together and then the strip is folded up and pounded flat. The side seam and wavy vamp seam are ornamented with some thick braid. The braid also continues around the stacked leather within the heel. More on this when we discuss the heel. A large portion of the boot is embroidered all over in gold thread, and it is so fine that it can easily be mistaken for painting.


This boot is also described in Sigmund von Herberstein's Rerum Moscoviticarum Commentaruii (Description of Moscow and Moscovy) published in 1559 (Swann gives the date of 1557, perhaps an earlier version than I was able to dig up, but the date on the author's picture says 1559). Herberstein visited many regions of Russia and wrote quite a treatise on the things he did and saw there, and he mentions this particular boot. He describes knee boots that are "usually red, with small nails in the soles, and some in the front (that is, the upturned toe); at the raised heels (probably the bottom center back of the upper) the boots have studs which server as spurs." (Swann, 94) You can see how similar the woodcut is to these Tartar boots.


There are two holes at the side which serve to assist the wearer in pulling the boot on. Along these holes, there are actually small stitching holes along the edge of these holes which probably once contained some kind of ornamentation. Both the ornamentation and the holes themselves are illustrated in Herberstein's woodcut, as well as the braid and the top band.


The toe itself seems a little bit mishapen, and the thickness of the sole suddenly changes from being a thick, sturdy sole, to something else much thinner. There is no obvious reason why the sole would suddenly change thickness. Initially, I suspected that, as in the woodcut, there was some kind of decoration, either silver tips with a hobnailed appearance or possibly hobnails themselves. The decoration might simply have been removed at some point or the boot damaged. However, in my discussion with the curator, I discovered the toe of the boot had actually been damaged and restored at one point, which resulted in an unnatural looking shape. Stitching is visible at the toe, likely the original stitches, but the fact of conservation does not completely mean that there wasn't some decoration originally. Additionally, per the curator, there originally were some hobnails originally in the toe of the boot, as Herberstein describes in his treatise on Russian boots. Irrespective, our area of interest here is the heel, not the toe.


Note also that there are ridges down the front of the boot. These were intended to be riding boots, and even today, some modern cowboy boots have ridges, perhaps to both protect the vamp of the boot itself as well as to better hold the stirrup in place. The ridges could have been sewn into the boot itself or possibly tooled, although I suspected that tooling would have not produced ridges with such definition. More on this later.


Let's shift our attention to the heel itself now. We first notice the braid on the side seam and vamp seam, but if we look even more closely, there is also braid along the quarters where the stacked heel is. There is also what seems to be a vertical bit of braid on the far left side, just above the quarters seam, and beneath a bunch of boar bristles. To tell you more now would spoil the puzzle, so read on to find the answer later. Focusing on the thick outersole itself, we have another puzzle. For the front part of the boot, it seems to be entirely turnshoe construction, but once we get towards the heel, we see something else going on. I had originally thought that this boot was entirely welted, but it turns out that the boot was constructed using turnshoe construction for the vamp which changed to stitchdown construction at the heel. Swann describes stitchdown construction in which the bottom of the upper, instead of being sewn underneath the foot as in a typical turn shoe, is folded outwards and then stitched through the sole. This same technique is used for long poulaines, where it becomes very difficult to turn the long pointed toe right side out, so it is left unsewn and attached to the outsole using stitchdown construction. In this case, it is cleverly used to attached the stacked heel. This type of heel construction was becoming more popular in the last quarter of the 16th century, and there are certainly (ambiguous) references as early as 1564 regarding heels (Swann 97), but by 1589 (see the memorial brass to Mary Carewe in the Pictorial section) thgere is clearly a separate heel. Swann suspects (96) that repair pieces added to the heel, sometimes stitched, sometimes hobnailed in, were discovered as prefential because they assisted to raise the heel and shift the posture slightly.


Talking about the boar bristles for a moment, the curator mentioned that they glued in some additional boar bristles where they found some at the back of the heel. However, I was unable to get my boar bristles to be very stable and not poke through at least a little into the boot. As a result, there is was a clump of boar bristle digging into the back of the wearer's ankle. To fix this, I bent the bristles down where they were set into the boot, and sewed an oval leather patch over the bundle of bristles to make it more comfortable. Although Swann says that the bristles may have been used as a support rest even though she admits that Herberstein says "they use spurs little," an article from the Livrustkammaren periodical publication (Vol XIV, Issue 5, page 128 in 1977) says in the caption that "It is designed for a stirrup but not for a spur." It also provides a pre-restoration photograph in which the hobnails are visible. Unfortunately, the article is in Sweedish, but a good friend of mine who speaks Sweedish (thanks, Geoffrey!) was able to read through it, and really talks more about how the boot came to the museum and how it was dubbed "Bishop Brynolf's Boot." If you would like to read the article, do post and let me know.

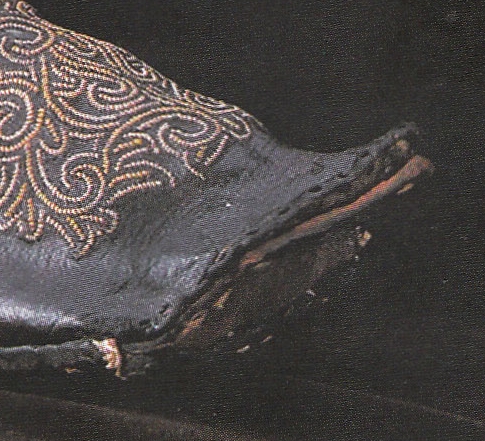
If you look closely, you will see hobnails at the bottom of the sole which keep the thick outsole attached to the boot at the heel. I was fortunate enough to get some photographs from the curator (which I cannot share here) but I can give you my rendition of them to give an idea. Additionally, if you would like the photograph for your own personal use, please do send me an email, provided you will not publish them in any way. You can see three rows of hobnails, tightly packed, and staggered in such a way so as to leave practically no space between them, except when the very back of the sole is reached. There is also a clump of hobnails increasing the thickness of the row to 5 at one point. The heads of the hobnails themselves are likely a little under 1/8" in diameter, and this number is reached by using a 2.75" wide heel on my own size 12 foot and computing the relative size of the hobnail. Notice also the three ornamental lines of tooling in the sole. They form a pattern looking something like this: )I( Swann suggests that this

Interestingly, one thing that I did not even notice until I looked closely at the picture at high magnification is that the stitching goes all the way through all layers of the stacked heel and end up neatly nestled into a groove in the sole. The hobnailing is so dense and well done that all evidence of the stitching is covered up, except where some of the hobnails have fallen out, giving us a peek into the boot's construction!


The back of the heel is equally interesting. I again give you my poor rendition due to copyright reasons. First, we notice that the outsole itself actually continues up the back of the boot, and it is also hobnailed a portion of the way up the back. because the boot had not undergone restoration yet, it is a bit mishappen at the very top, so it is difficult to see exactly what is going on. As a result, I have drawn some dashed lines for possible seam construction. One can clearly see the braid that covers the stitches holding the sole to the upper, and one can also actually see the upper slightly folded out and attached to the soles. A picture is worth a million words, so again, if you would like to view the picture yourself, send me an email, and I'll make it available, provided you do not publish it in any way and maintain the copyright.


Lastly, I received a photograph which details what the full back of the boot looks like, but unfortunately, my artistic skills are simply not sufficient to render it with any kind of clarity, so you'll just have to email me for the photo or take my word for it. The boot is fairly vertical in nature which neccessitates a slit at the back of the boot going from the top to about halfway to allow a calf. Another thing that I cannot quite tell is if the boot is actually lined or if the leather is simply splitting from age. Having a lining would make sense, but I do believe I actually can see evidence of the side seam stitching from the inside. I suspect that this boot might have been lined, but I could not get any additional information on that end.

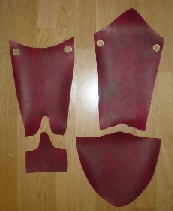
Time for the actual reconstruction section. I've skipped several steps in the process, as anyone reasonably familiar with basic turn shoe construction should be able to fill in the missing pieces. If you have questions, of course, please do contact me. The wavy vamp and holes in the upper are easily seen here, and you can see how I've pieced the pattern together. One thing that is not clear is that I used significantly sturdier leather for the quarters than for the rest of the boot - the justification for this is somewhat vague. To me, looking at the extant piece, the quarters "seemed" heavier. Considering that the heel is what contacts the animal (the Tartars did not frequently use spurs), this made sense to me, so I went with it. I also used oxblood dye mixed with a little bit of dark brown because the original was of red saffian leather, but has now faded to brown due to conservation.


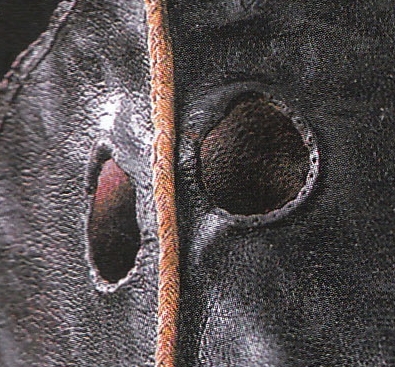
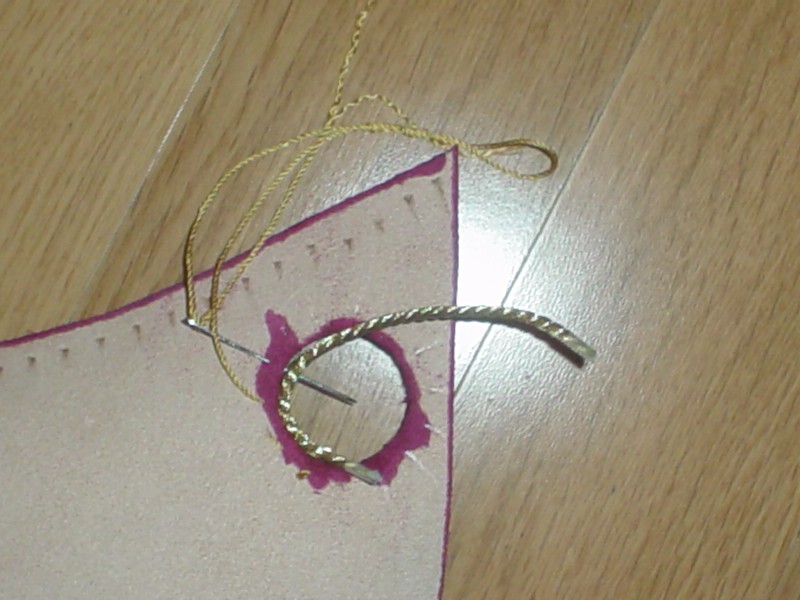
A close up of stitching the braid to the inside of one of the pull holes. I used the same technique for the top of the boot as well, basically awling a hole through the thickness of the leather and using heavy duty silk to tack the braid down. You will see that, for the side braid, I actually tacked down the braid going through the seam itself after it had been stitched. A blunt needle does a good job at sliding through the gap between the leather seam, even after it has been pounded flat.


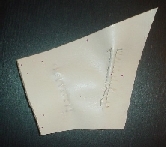
Let's discuss the ridges for a bit. Swann says that "This plain area is neatly pleated, probably by tunnel stitching on the inside, to reinforce and curve the leather." I am going to have to respectfully disagree with Ms. Swann in this instance (although skill, or lack thereof, may certainly play a role!). I tried multiple techniques to try and get this look. Tunnel stitching on the inside (the flesh) is shown on the left, top photo. It looks nothing like the ridges in the leather. Then, tunnel stitching on the outside (right bottom, top photo) is shown. It is getting close to the correct look, but is inconsistent. Then, I switched to through stitching, which is shown on the right top (top photo), in which the material goes through the leather on one side and comes out on the other, with the stitch being pulled reasonably tight. It looks very similar to the actual extant piece, so I went with this technique. The ridges are actually a bit thicker in my piece than in the original, but I suspect that this is due to the use of thicker leather and conservation, which tends to thin the leather somewhat. I've also included the underside of the sample piece for your reference.


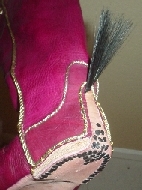
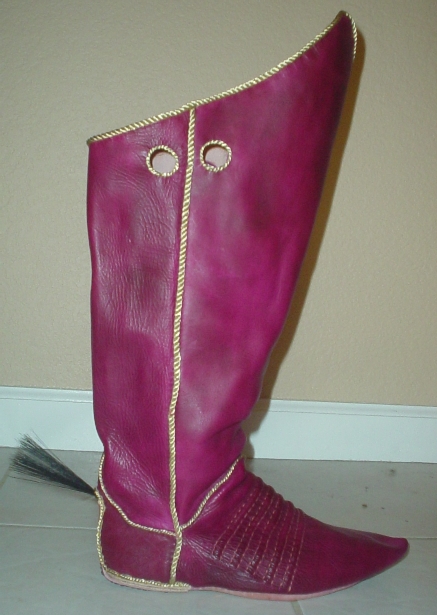
Several expletives, some hard work turning, some angst, some blood, and a great deal of time later, we have a pair of finished boots. Whoa, you say! What about the interim steps? Well, I go through some of that a bit later on, but basically, this is turn shoe construction with edge/edge stitching on the upper (the upper part of the boot) and edge/flesh stitching on the upper/sole interface all the way up to where the heel is to be inserted. If you are unsure of these terms, then refer to Marc Carlson's excellent website. Here is a side view for you. You will notice a few things - first, that the calf of the boot is angled forward significantly. This was done at the request of the recipient to have an enclosed boot rather than a boot split up the back through which his calves would stick out. Secondly, there is no ornamentation - I had briefly (ok, very briefly) considered embroidering the leather, but I decided against it. I suspect at some point that the boots will get painted in a fashion similar to the embroidered boot. Lastly, the boar bristles seem longer and thinner - that is partly a matter of perspective (the extant boot is not pictured directly from the side, but slightly to the front) and the fact that I used a much smaller quantity of bristles to ensure that they stayed in as tightly as possible during wear.


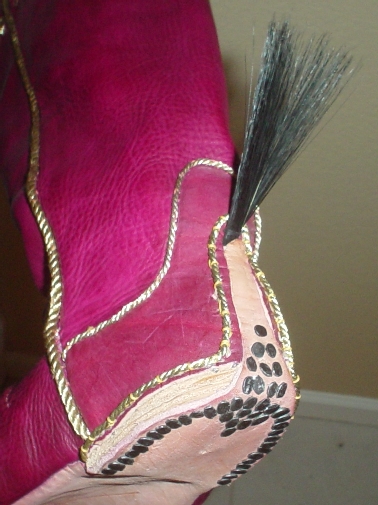
A close up of the heel. You'll notice that I used only one row and a different type of nail than the hobnails that were used in the extant piece. This is because I could not source hobnails of appropriate size (most of them seem to be around 1/4" instead of 1/8"). Additionally, I tried to find some round or diamond headed nails, such as hinge pins or hardboard nails/pins, but the issue with hardboard pins is that most of the shorter ones are copper covered, and I didn't feel that would work as well. I simply didn't have the time to get appropriate hinge pins delivered, try them out, and order more if they did not work, so I made an executive decision. Another thing to note is that the stitches actually go through the upper and then through the thickness of the sole that is pointing up - there is evidence of some horizontal lines of stitching in the back view of the heel of the extant piece up above.

Regarding the bristles - well, I don't know precisely how they were kept in, and there are no bristles in Herberstein's boot, so I suspect that they are ornamental. However, a bunch of stiff bristles well placed into a boot might work as a spur, but they would have to be very sturdily installed, and I'm not certain what the most effective technique would be. I ended up tying three small bunches together with thread and jamming them in between stitches and then covering them up with a small oval piece of leather on the inside. Additionally, I probably should have made the heel piece that sticks up thinner and longer, but because I was going to ornament both seams with braid (as opposed to just the seam of the sole in the extant piece), I decided to give a little space between them.


A close up of the stacked heel. You'll notice that I only used three leather stacks (yes, there are three there), with the first being stitched to the upper itself, and the rest are attached with hobnails. Knowing what I know now, specifically that the stitching passed through all layers of the heel, I would have done it differently. I only used three layers because the stacking leather I used was significantly thicker than the stacking leather used in the extant piece.


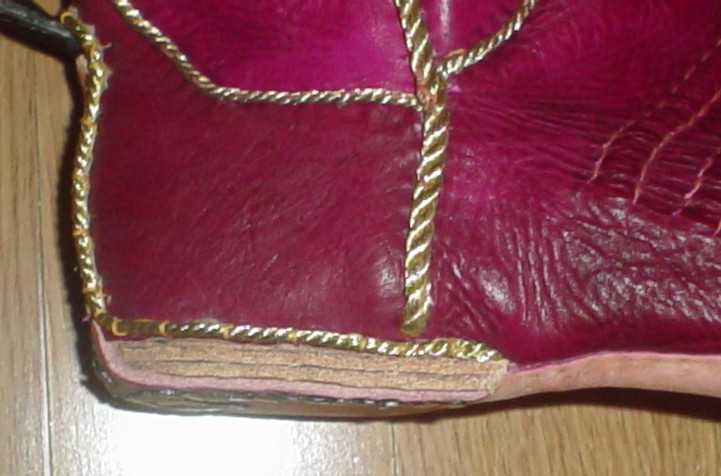
Close up of the sole. Note the ornamentation ")I(" that is also in the extant piece. Additionally, you will notice that there are no hobnails in the toe. I was working on another outfit, not related to this lesson, (I'm on the right, and yes, I made my shoes as well as those of the lovely lady on the left which you cannot see =) and only had a short time frame to get these boots finished before I could sew my suit together. The main reason for the delay was because the iron lasts I have are designed to only have heel hobnails placed, not hobnails anywhere else, so I will have to alter my last to allow this. I'll likely take them back at some point to put the hobnails into the toe once I've altered the iron last.


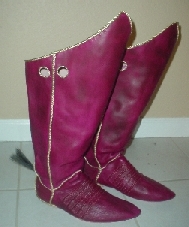
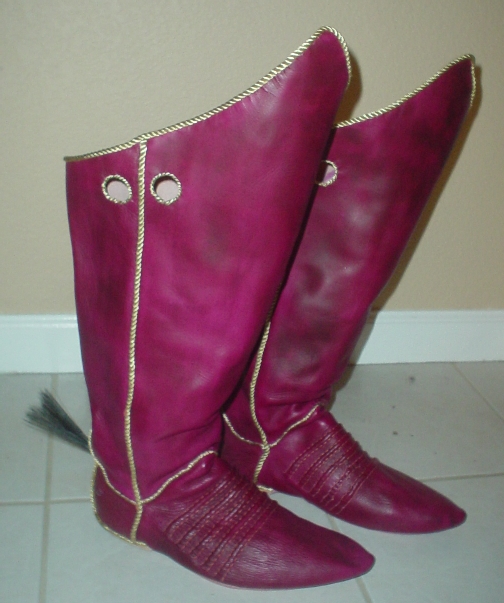
A final view of both boots. In general, I was rather pleased with them, especially because they fit who they were intended to fit! If I ever make another pair for someone, I will probably use more authentic hobnails and I might line the entire boot. When the boots were delivered, no less then seven different people tried them on, and it was rather difficult to convince them to return the boots to the party for whom they were intended. =)


Shortcut Bar

Researching the boots.
The dyed and patterned leather.
Figuring out the ridges.
Heel Construction.
The finished boots.

Comments on: Lesson #4: 1582 Tartar Boots (Stacked Leather)


By: raisedheels

In reply to Argan. Thanks very much for the comments! It would not surprise me that these had a different origin than the Rus lands at all.

By: Argan

Dear authorized, These boots are really cool. its origin is turkish, not russian. Their other names are Kırım's Türks and they talk Turkish language. This is a real information for you. I hope you are interested. Greetins and love from İstanbul Argan Öztaş

By: raisedheels

In reply to Ilya. Thank you! You may not have seen the entire writeup for these boots at http://aands.org/raisedheels/Lesson4/tartar.php. Take a look and let me know if you have any other questions.

By: Ilya

Your boots is very good! Have you more information or maybe photos of these tartar boots?

Click to add your comment!