Lesson 1: Late 16th C. Venetian Chopines (Cork)
June 15, 2006 - No doubt you have already read my pages on documentation and techniques, correct? If so, you will be familiar with the history, use, and basic design and construction methodology of chopines. If not, I suggest you review it, since it has a lot of information on the techniques that we will be using.
In period, as I said, wood or cork was commonly used in chopine construction. It's rather simple to find a chunk of wood large enough (you just cut down a tree), but since cork is taken only from the bark of a cork tree, the bark (which can vary in thickness, but is not thick enough for a chopine on its own) would need to been pinned in layers to create a form that is large enough to be carved into a chopine. Further, period materials and time are not exactly freely available, so I have taken a few shortcuts as you will soon see. In this lesson, I am using cork as the base material. As always, if you have any questions or comments, feel free to post and comment to ask for more information. This page is graphic intensive, so I apologize in advance.
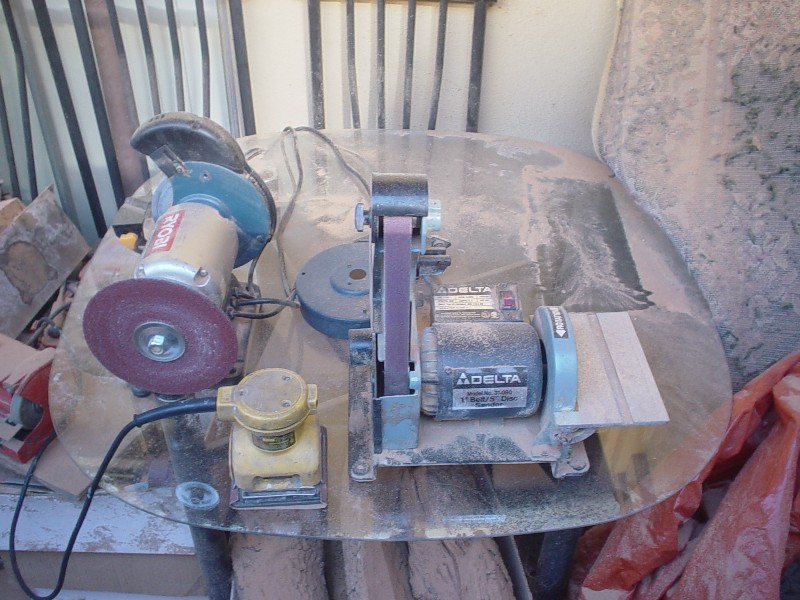
First, let us start out with some of the tools you will need. For power tools, I use a 5" bench grinder with a standing disc (30 grit or so will last you for many pairs of cork chopines), an orbital sander with 60 grit paper (necessary for smoothing out imperfections), and a vertical belt sander. You don't really need the vertical belt sander, but I find it is useful in certain spots. Make sure your sanding disc is larger than your grinding wheel, or just take the grinding wheel off, and attach the sanding disc. |
 | |
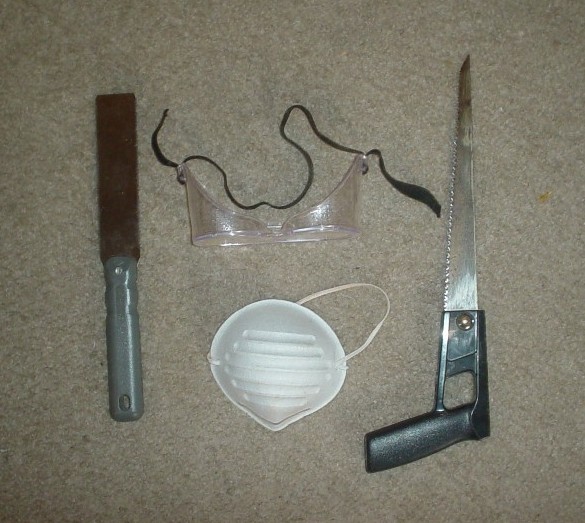
I also use two kinds of hand saws, one a coarse bladed saw and one a fine, thin bladed one. The coarse one is used to cut the form out of the cork (you could use a box saw or large wood saw as well), and the fine saw is used to chop off little bits and pieces to make the sanding easier, but it isn't essential. Because you will be generating a LOT of cork dust, a breathing mask and a pair of work goggles are essential. The first time I did this, I ended with a face full of cork dust - I don't recommend it. |
 | |
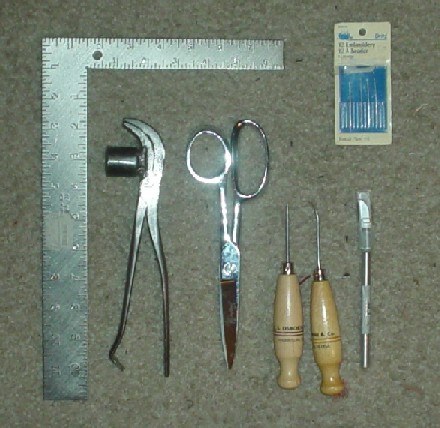
There are also a variety of hand tools involved in this process. Shown here are a curved awl, stabbing awl, exacto Knife, lasting pliers, leather shears, straight edge, leather tooling tools, and needles. These materials are common to almost any raised heel. |
 | |
You will also need quite a few different materials as well, such as linen thread, boar bristles (or 40lb test fishing line), coad, dye, an open plastic container, a foam brush, latex gloves, small nails about 3/4" long, hide glue or barge cement and adhesive spray. You'll also need (not shown) 4-5oz leather for the insole and vamp, 7-8oz leather for the outsole, soft leather or fabric for the surround, drafting paper, 3 yards total of braid to cover seams (optional), metallic lace and upholstery tacks (optional), tassels (optional), 2 yards total of lacing material (if you are using a split vamp), and 2 aglets (again, if you are lacing a split vamp). |
 | |
You'll also need some cork. The cork shown here is also called "high" density cork or "tan" cork, made up of dense pieces of cork which are compressed and attached together with a binder to make a large block of cork. It is solid and carves very well. There is also another version of this called "low" density or "dark" cork, which is very weak and crumbles easily. You do not want this, as the chopines you put so much effort into will undoubtedly break apart in use, and your beloved will get very upset, having broken or hurt herself. This cork is available at several places, including Maryland Cork Company (you will have to contact them for pricing and stock), The Cork Store (look under Arts, Crafts, and Hobbies and then under Cork Decoy Blocks & Kits). They come in a variety of thicknesses and sizes, but are usually 2' by 3', and really only good for people making several pairs, so find someone to go in with you. You can also use wood, but it is harder to carve and can be more expensive. See Lesson 3. |
 | |
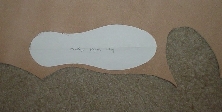
All right, let's get started with construction! First, you'll need some patterns. The first step is to get an outline of your customer's foot. Be sure to trace very close to their foot, and press your pen in against their foot a little bit as you go. This will give you an accurate outline. Then you will create an upper sole pattern from this outline (remember, chopines have two soles, and upper sole, called an insole, and a lower sole, called an outsole). This insole is symmetric (since most of the chopines I have researched have also been symmetric, meaning neither left nor right footed), so you will use it for both chopines. It doesn't have to be perfect, it just needs to be close enough, since the chopine will be a bit larger. Make it work. |
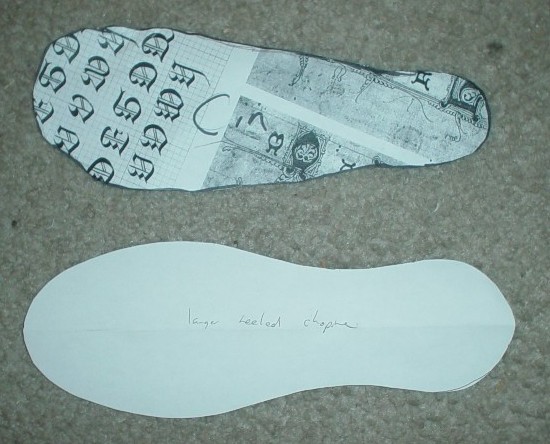 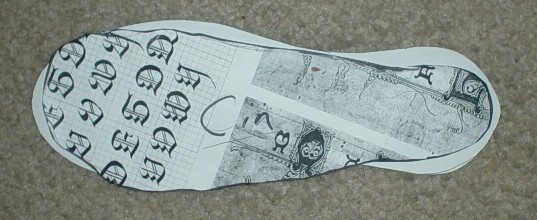 | |
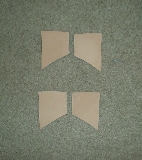
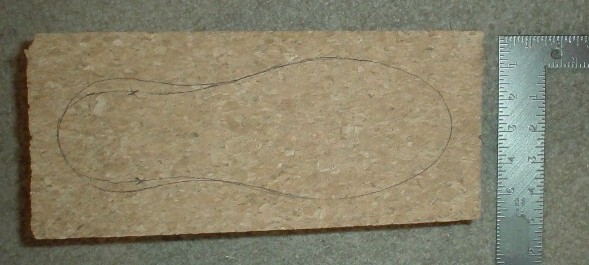
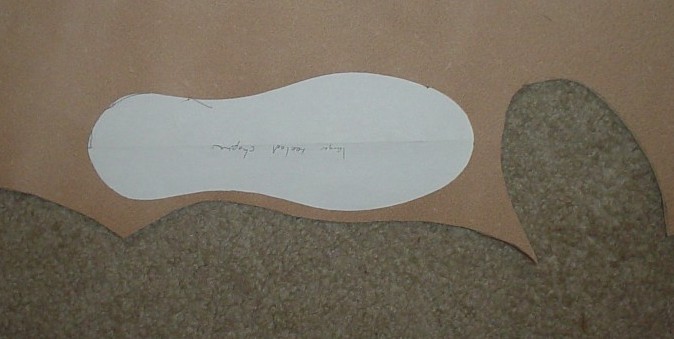
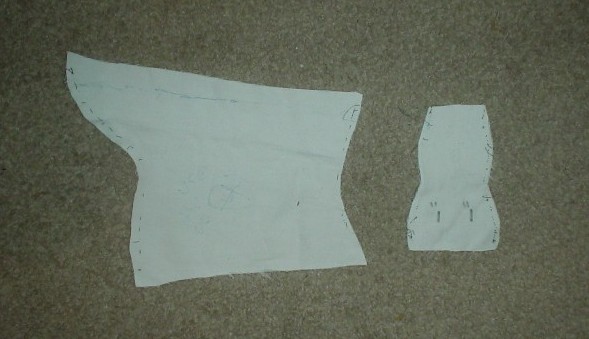
Next, you will need to generate a pattern for the chopine itself. Look at a couple of pictures in my Pictorial page, in the Links page, search the web, or examine many of the other resources out there until you find a style you like. You want to make the outline a little bigger than the insole pattern that you've just generated (notice that I folded the insole pattern in half) |
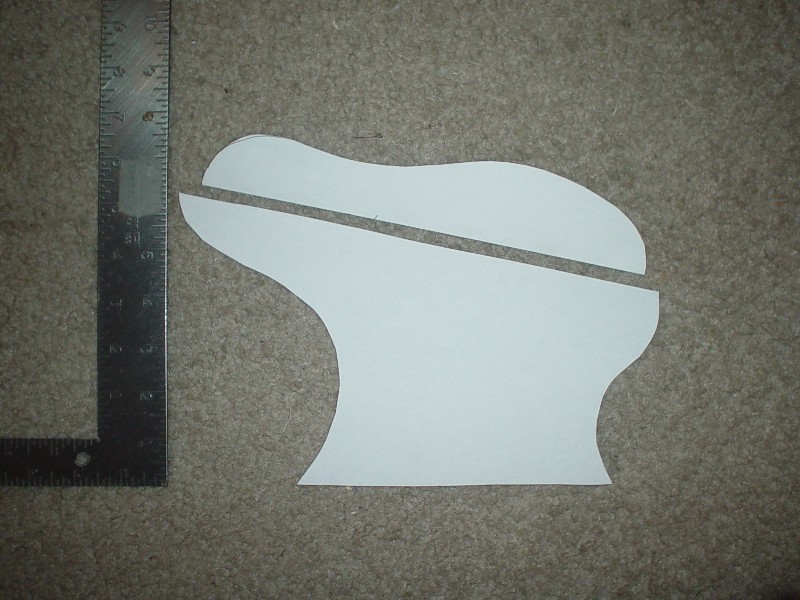 | |
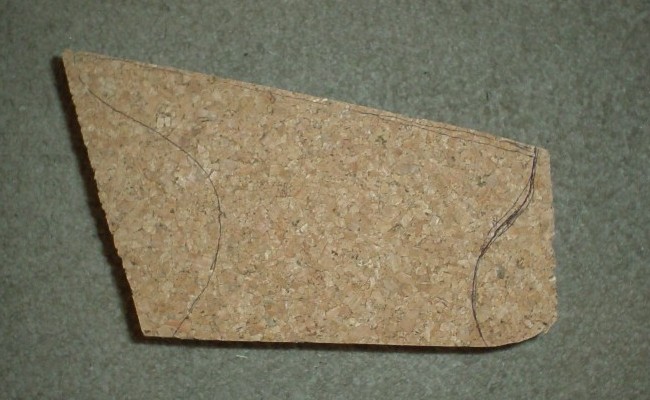
Now, you will need to cut the form out of your bulk cork. Nothing fancy, just cut it out and don't use curves, because they're hard to cut in this material. Notice that I cut the form out of the cork in the orientation shown. The reason for this is special. The cork block is 6" thick, which is plenty for a 6" tall chopine. However, it is easier for me to cut an angled surface in the cork than it is to sand down to an angled surface, so I decided to cut it this way. Your mileage may vary. Either way, be sure to draw an outline of the chopine before you cut it out. I find it is helpful to draw the outline on both sides so that I know if I'm actually sawing straight. |
 | |
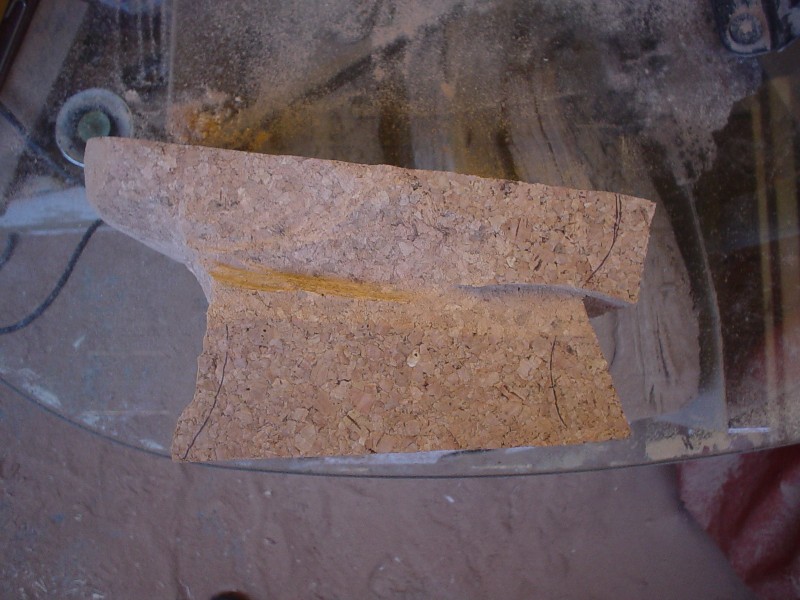
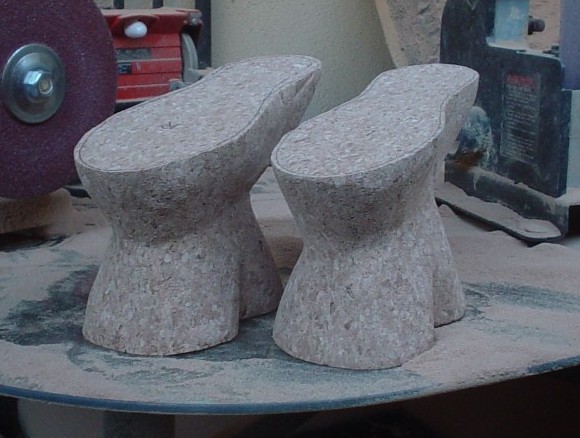
See the cut out piece of cork. As I said, nothing fancy, just get it cut out, and don't worry if the cork is crooked on the top or bottom. You will have to smooth it out anyway. Just be sure that the cork is slightly larger than your pattern. Remember, if you're making a pair of chopines, you'll need two! |
 | |
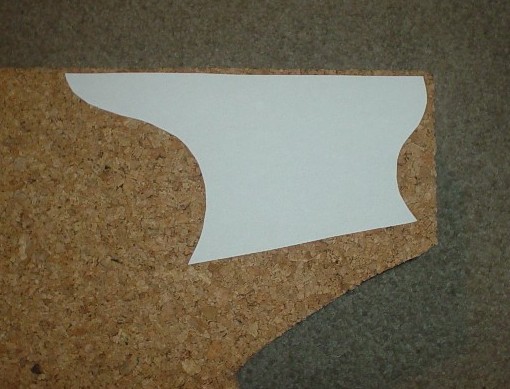
Now take that wonderful insole pattern that you made and lay it on top of the cork and trace around it. Make sure you center it as well as possible. |
 | |
It's time to sand! Get that protective gear on and fire up your bench grinder/sander. This is truly where the artist in you needs to come out. It's hard for me to describe exactly how to do this, but I have given an overview in the Techniques section. To begin, start with flattening and smoothing the top and bottom of the chopine. Make sure that they are ground down to the right hight and are reasonably level, especially on the bottom. You don't want a wobbling chopine. Once this is done, start with the heel. Cut close to the outline of the sole, but leave at least a quarter of an inch of border around it. Then start grinding away the inner curve. Don't worry if it doesn't match your drawing exactly, since it is really only there for reference. |
 | |
Once your heel is somewhat ground down, you need to cut a parting line. Most chopines got narrow from the top, and then widened out again. You will need to decide where this line should be, and it is usually at the narrowest part of your pattern. So, grind a notch all along the length of the chopine as shown. Trust me, it will help you later. |
 | |
An almost finished chopine. Note how I have left a nice border along the outline of the insole. This is important for later. I've also done a lot of smoothing out with my orbital sander. | 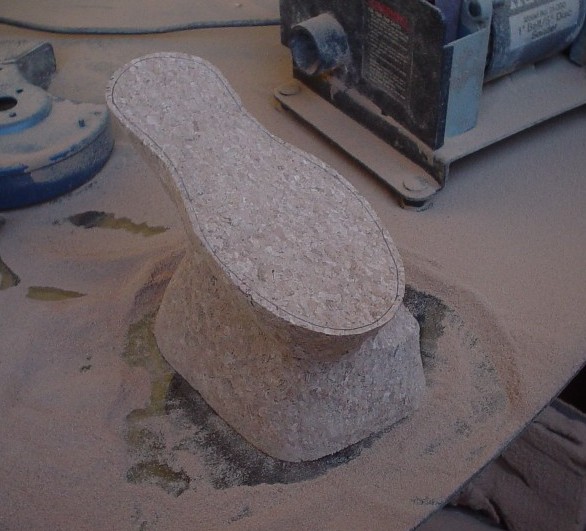 | |
One chopine finished! Note the notch in the bottom side of the chopine. This was popular on many of the chopines that I've examined. I'm not really sure of the purpose, but I'm guessing that it was there to take in any excess slack on the covering material. Perhaps it was there for decoration as well. |
 | |
Here is the other chopine. It is a bit tricky to make them look identical, but do the best you can. I find that sometimes, even though they are supposed to be symmetric, they seem to look better with one as a left and one as a right. If this is the case, then I mark L and R on the top and bottom of each (left being the left foot if I was going to put them on). If not, I just pick one to be the L and the R, to make things less confusing going forward. |
 | |
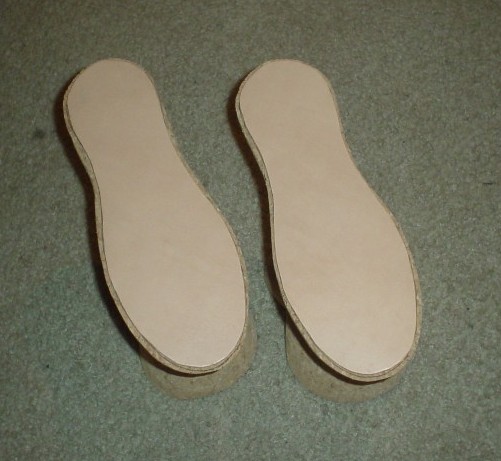
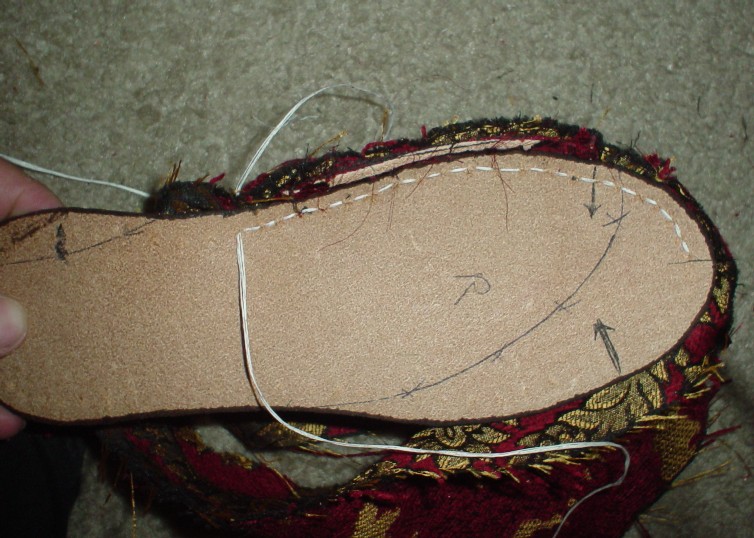
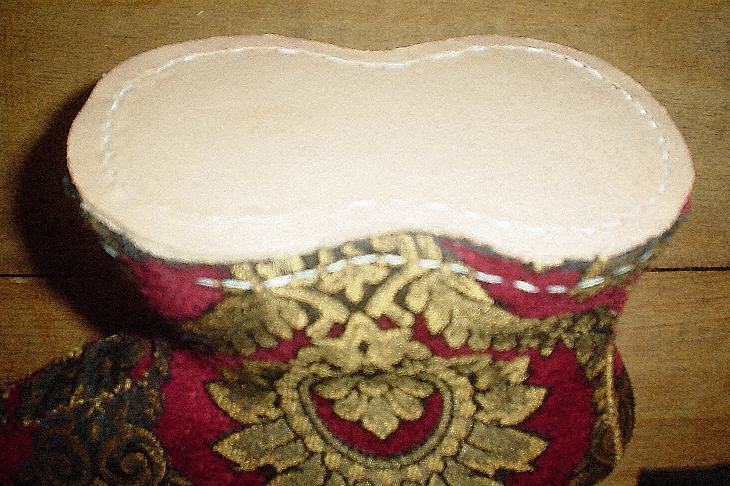
Now we need to cut the insole. The insole is the piece of leather that the person's foot is actually in contact with. Use the symmetric insole pattern that you made earlier to draw an outline. Make sure you draw on the flesh (the rough side) of the leather, because if you make a mistake, no one will see it. If you draw on the grain (the smooth side) of the leather, it will be visible unless you dye your soles black. |
 | |
Once you've cut out your insoles, you need to tailor them for each chopine. It's important that they are a little smaller than the chopine itself, leaving a little bit of a border along the edge so that when the covering material is attached, it has a little bit of trim (most of the chopines I've looked at have this kind of border). Trim the insole it down where necessary, and label them on the bottom (the flesh side). |
 | |
Now it's time to awl your insoles. The idea here is to make a hole in the side of the leather that does not go all the way through the thickness of the leather, but rather goes in the flesh side of the leather and comes right out the side. Note that you can also use a straight awl here, but I find it more difficult to make my holes accurately with one. |
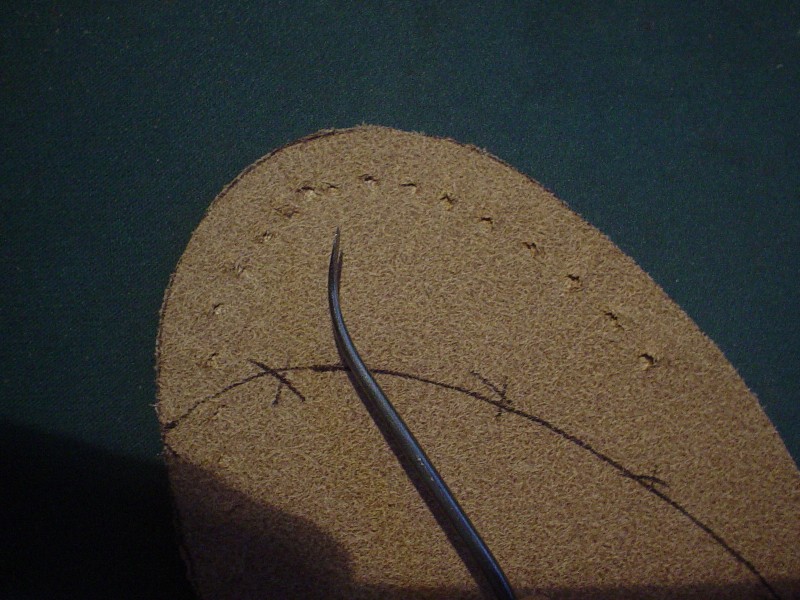 | |
This shows how the awl goes in through the flesh, but then comes out the side. If it went all the way through, your stitches would be seen, and you would be wearing them down by walking on them. As you make the holes, make sure you space them a little closer together as you go around the toe and the heel, so that the resulting exterior spacing remains about the same. |
 | |
Now that we have the insoles finished, it is time to dye them. Give the grain of the insoles two good coats of dye. Don't soak the heck out of it, just make it enough to absorb and cover fully. It will look a little bit shiny at first, and then the leather will absorb it. I don't use any kind of conditioning afterwards, because it takes a lot of moisture to make the dye come out of vegetable tanned leather. |
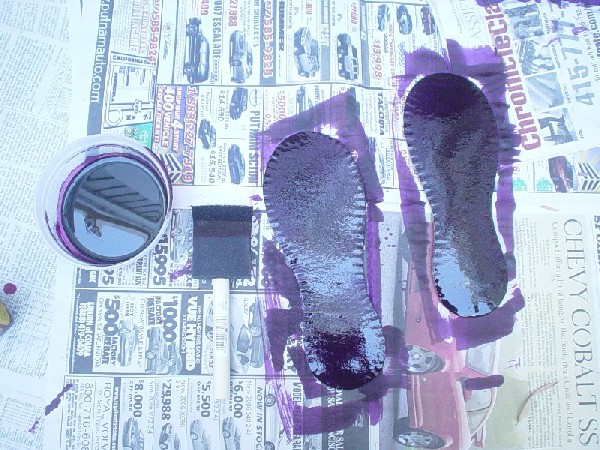 | |
Another thing that is important to note is to dye the edge of the insole as well. If you don't, you will end up with a thin line of natural looking leather which, next to your lovely leather, velvet or brocade, looks unfinished (thanks for modeling, Donata!). |
 | |
After you've dyed the insoles, you can add a little spice to them. Many of the period examples have a design tooled into the insole, and I've decided to do the same in this instance. It came out quite well. |
 | |
A close up of the tooling on the insole. Since I didn't have any actual leather tools, I found something that worked nearly as well - the large star bit (not the Phillips head bit) in my tool kit. |
 | |
Now we can pattern out the covering material, also called the "surround." In the photo, I have given you an example of what the pattern for a surround will look like. When you pattern this, it is very important that you make the length on the bottom at least two inches longer than it really needs to be. If you don't have enough fabric to tug under the bottom, you are in deep trouble. Depending on the fabric you choose and the geometry of your chopines, you may also need an additional long, vertical rectangular piece that goes up the back of the chopine. This is because it is sometimes difficult to get a tight fit with fabric cut straight on the grain. |
 | |
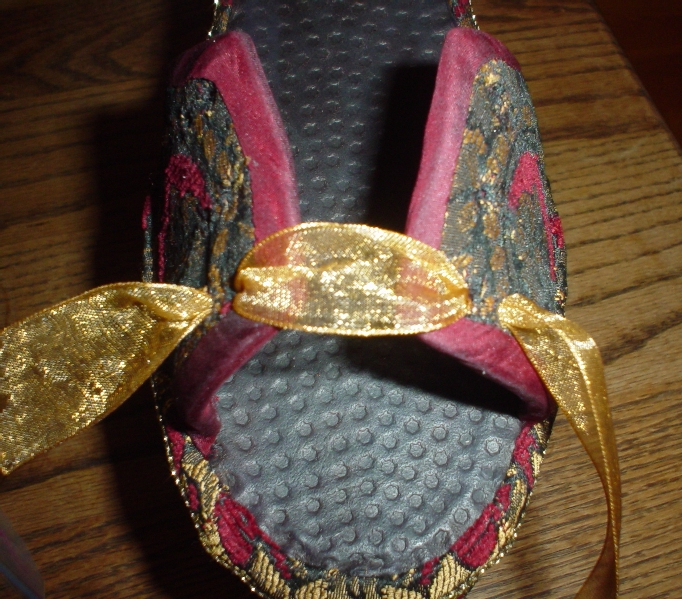
After you have shown off your chopine blanks to your friends, you need to make an appointment with your client and measure her for the vamp (if you have not done so already). The vamp is the upper part of the chopine which holds the foot in place. It needs to be located far enough back so that it holds the foot in the chopine, but not so far back that it is difficult to walk in. You should also decide on what kind of vamp is desired. In this case, the lady desired a two piece vamp, in which holes will be punched and a lace inserted so that the chopine can be tightened if necessary. Other vamps are also possible - see the Pictorial page. I ask the lady to stand on the chopines, on top of the upper soles (it helps if someone holds her hand through this process), and then I use a piece of paper, trimming it to the correct shape and location. Try and get a close fit, as the leather will stretch a little, and it is better to have to wedge your foot in than have the chopine be too loose. Be sure to measure where the band should be on the chopine and mark it. In this case, I have chosen to use the same leather as the insole. |
 | |
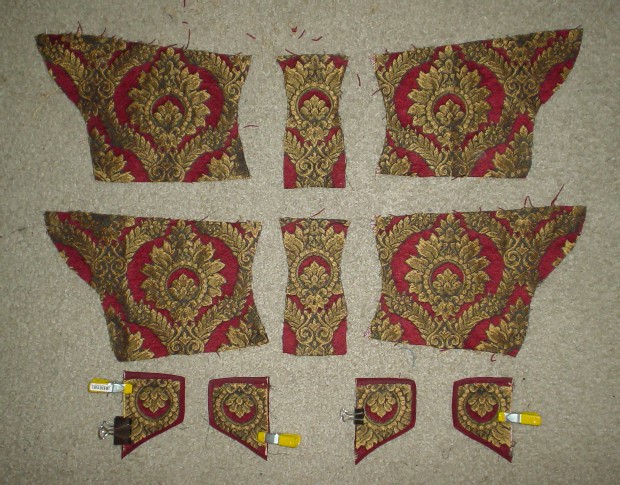
One you have the vamps cut, you need to punch holes in them, if there is to be a lacing. You will need two sets of holes as I have shown, and the reason for this is because of the way that the chopine needs to be laced. Then you can cut the covering and lining material for them. In this case, a jacquard (since real brocades are extremely expensive) and silk taffeta were used for the covering and lining/edging respectively. There is one thing that is also very important about this process. You must make the covering and lining material longer than the actual leather in the place where it meets the insole. The reason for this is because fabric requires a much larger seam allowance than leather does, and if you do not do this, then you will have great difficulty sewing the vamps to the insole. See below. =( |
 | |
A picture of the covering and lining for the vamp sewn with silk tape and placed next to the pattern pieces. Note the little clips on the edge of the vamps where they will be attached to the insole? They are used to tug the fabric far enough past the edge of the leather so that they can be stitched to the insole without ripping their seam out. Please don't end up resorting to this, and cut your pattern longer, like I suggest above =) |
 | |
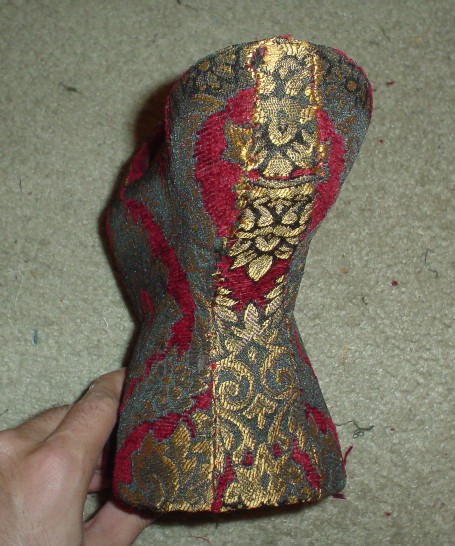
After you've cut out your surround, you can sew together the front. Most Venetian chopines were seamed twice up the front and once up the back, although there are some examples which show a single seam up the front. You also want to sew about one inch up the back seam so you can sew it to the insole properly. Put it on your form and see how it fits. It should be a little baggy, because you need to be able to pull it around. We may end up removing some material at the back, so a little baggier is better. |
 | |
Now it's time to stitch your surround and vamps to the insole. For more information on the stitching technique, please refer to the Techniques page. I highly suggest you start with the very top center of the insole and work your way to the back center, and then start at again at the top and work your way down the other side. This keeps your surround from moving and becoming offset. Note that the vamp needs to be sewn in between the surround and the insole. Make sure you have the orientation of the vamp correct! Also, note that I have marked, on both the insole and the base, exactly where the vamp is supposed to begin with little arrows. If you end up with more fabric than you need at the very back, do your best to fold the excess under so that you get a tight seam to the insole, yet still have the fullness needed at the heel. |
 | |
A picture of one side of the vamp sewn on. Your first couple of stitches into the vamp will be the most difficult. You can consider punching the holes with a stabbing awl rather than using a curved awl, but I find the curved awl to be easier, and it wears the holes less. This is the time when you will be very thankful that you punched your awl holes in advance. |
 | |
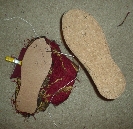
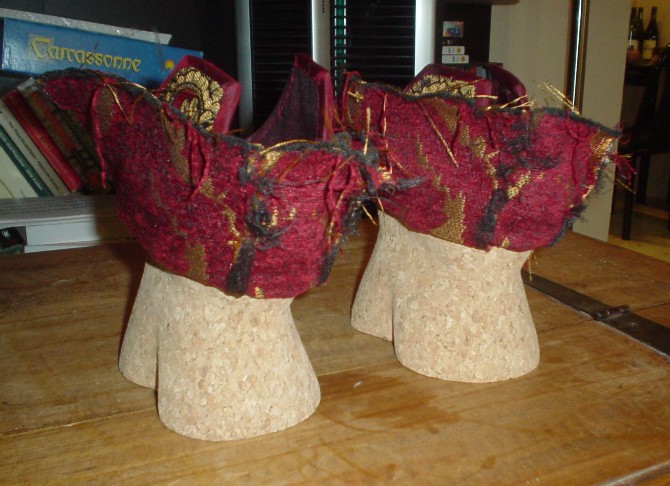
Once the surround and vamps are stitched on, we must glue the insole to the base. If you do not glue the insole to the base, then only tension is holding the sole in place. Without actual evidence, I believe they used a hide glue of some sort. Of course, if hide glue is unavailable, Barge Cement is always an option. Just be sure to use a very thin coat. Turn the surround almost all the way around except for the back center, and then glue both the top of the base and the bottom of the insole. |
 | |
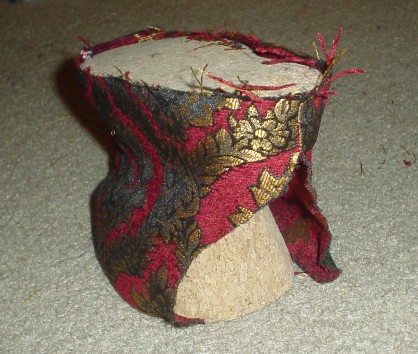
Placing the insole properly on the base is a little tricky. You should start with sliding the back center part onto the heel of the base. Then, with your hand in the vamp, push forward on the insole until it has moved forward enough so that the front of the insole is close to the tip of the base. I usually make sure there is about 1/16" gap between the front of the base and the front of the insole. Then, press down hard on the insole, joining the two together. If you use hide glue, you will need to hold it in place for a while until the glue sets. You can then pull the surround (carefully!!) down over the base. If you need to move the insole at all to make sure it is centered, do it now before the glue is fully bonded. When it is bonded, arrange the panels of the surround as shown. |
 | |
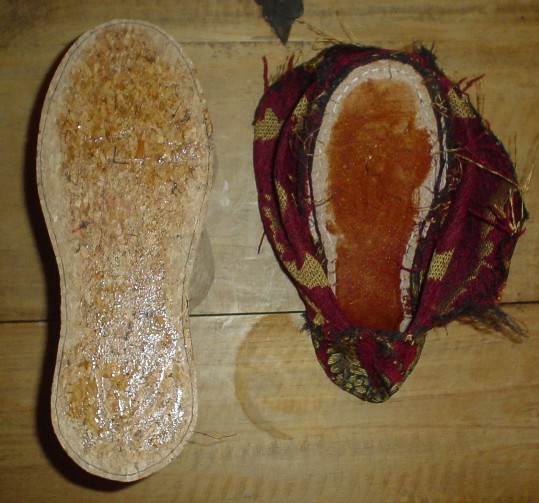
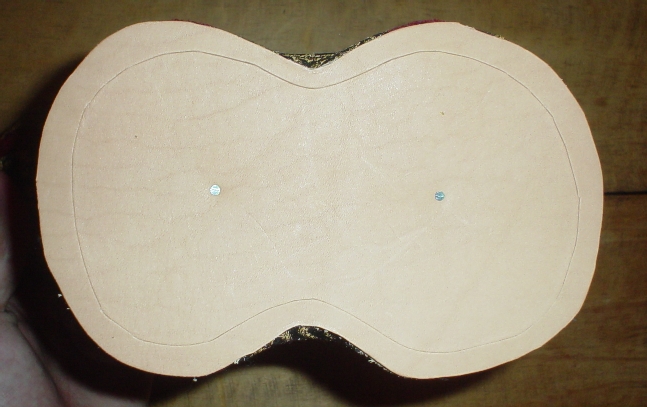
Before we continue, we need to pattern out the bottom sole, also called the "outsole" because that is the sole that is on the outside of the chopine and is in contact with the ground. Take your chopine and draw neatly around it, again on the flesh side. Be sure to mark which sole is for the left foot and right, and which is the front. Then you can cut them out and lay them aside. The leather you use for this should be the thicker material. |
 | |
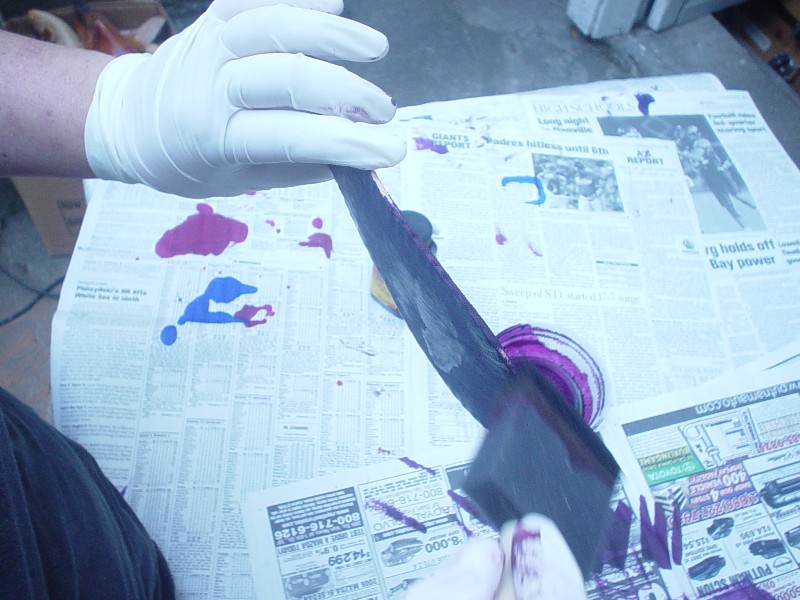
Once you've got the outsoles ready, we can begin to finish the surround of the chopine. Using your hide glue, put a thin layer all around the exterior of the chopine, except for a small vertical line in the back center. Then, pull the fabric down and tug it here, and there, and everywhere until it starts to take the shape of the chopine. You will still have a gap in the back - this is just fine, as we need to wait until the glue is bonded before we proceed there. If you do not have hide glue, I don't recommend using barge cement, as it is too thick. I suggest the spray adhesive that I described above. The advantage of this is that although it has a quick tack time, if you mess up, you can always pull it away and start again, but it will be permanent if everything works out. Lastly, using blind stitches (or very tight whip stitches) sew the two sides of the surround together. If you need to cut away some extra material, that is just fine. The important thing is that you get a reasonably good fit to your base. In my example, because the brocade did not stretch enough, I had to add a rectangular panel like I mentioned above. |
 | |
Now we're ready to start sewing the outsole onto the bottom. First, you need to trim the bottom of the surround to about half an inch and then glue or tack it down to the bottom of the base as shown. This is why I told you to leave extra on the bottom, because there really is no option if you do not. Glue is really better, because this way, you don't risk attempting to sew through a tack, and you could always put your glue down and tack it in place while you move onto the next step. It should look something like this. |
 | |
The next step is to make the eyelets for the lacing in the vamp. If you're using a solid vamp, then go watch Pirates of the Caribbean or something while you wait for the glue on the bottom to dry. It is a bit of a pain to do eyelets, but they really are necessary. See the techniques section for more information about eyelets. |
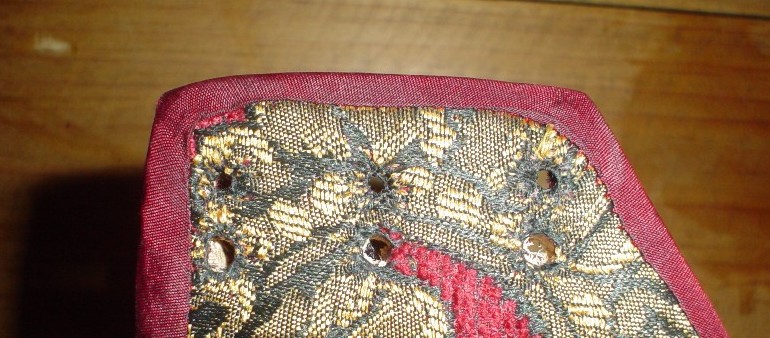 | |
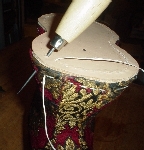
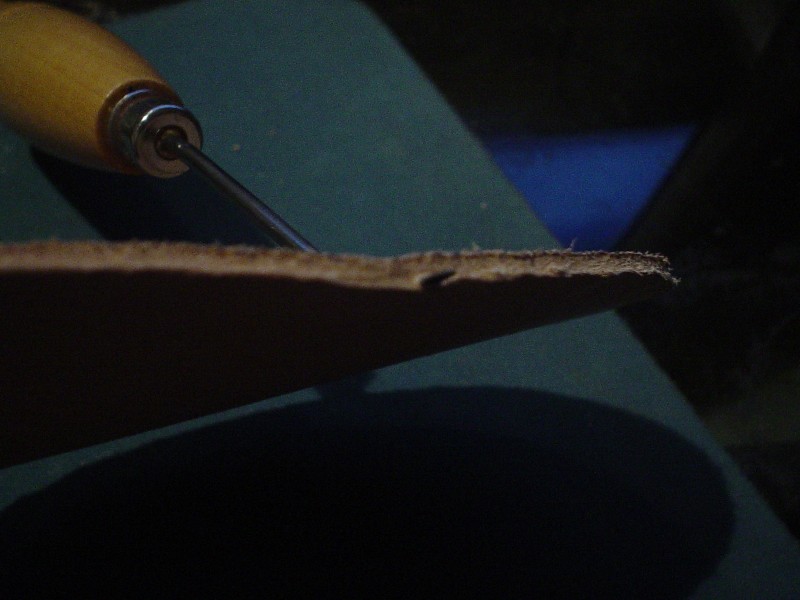
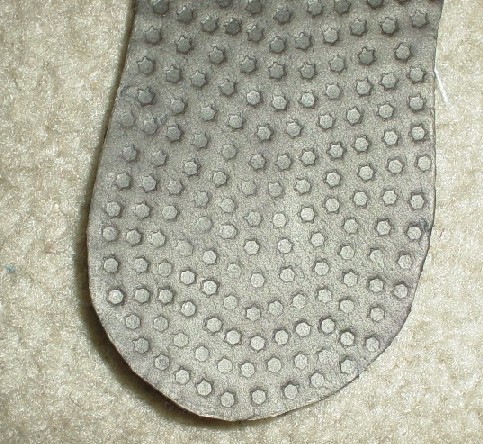
Once the glue on the sole has dried (or you've become impatient enough to want to continue to work), we must next cut the stitching groove into the grain side of the outsole. The idea behind this groove is to cut a score all the way around the outsole so that when you make your stitches through this groove and pull them tight, they get hidden in the score, and the wearer walks on the leather as opposed to the stitches. It is very important that you not cut all the way through the outsole, and this is where thicker soles come in useful. Use the x-acto knife with the curved blade (the blade is curved so that I don't cut completely through the leather, as I might with a triangular blade). It is important to keep the blade as perpendicular to the leather as possible. Once you've made the score, use two short (but not too short!) nails to tack the outsole onto the bottom of the cork, as shown. This will keep the outsole from moving around while you stitch. |
 | |
Now it's time to begin stitching the soles. Make yourself a 2 yard length of stitching linen and take out your stabbing awl. The idea here is to pierce through the sole, through the cork, and then through the outer material on the chopine, and then stitch through that. Try to make the stitching as even as possible. I am uncertain, as yet, if this is the actual methodology used, until I examine some extant pieces a little more closely. However, there is clearly stitching evident on the outside of the surround, so it definitely goes through the surround and is visible there. Whether or not it goes through the base material is something I have yet to discover. |
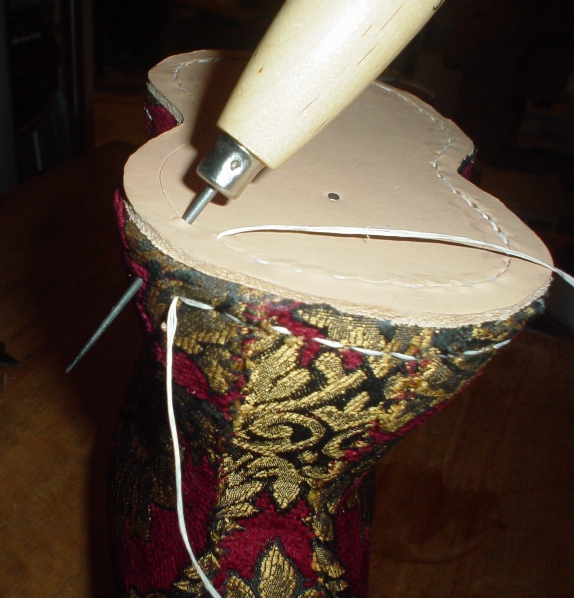 | |
Awl done! =) The outsoles are finished now, and they have been stitched through. Notice how they sink in to the leather and hide themselves. |
 | |
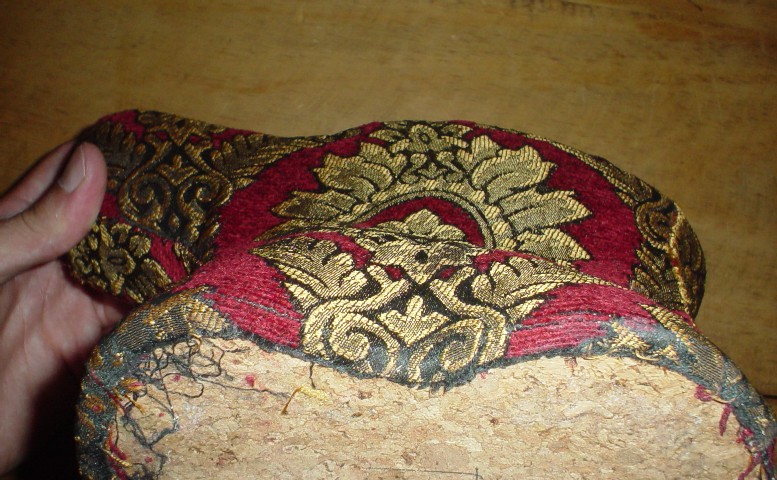
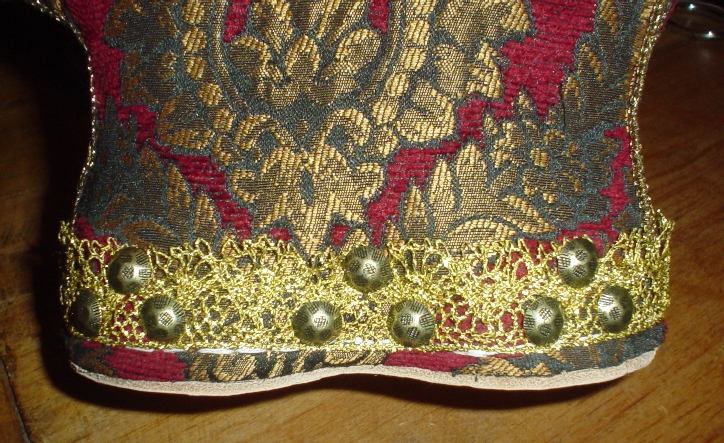
Many chopines had some kind of braid covering the seams as ornamentation, and we have done the same here. There is metallic braid running up and down each seam, stitched in with thread. |
 | |
Some chopines also had metallic lace held in with tacks to ornament the chopine further. We've done the same thing in this instance using upholstery tacks. |
 | |
Now it's time to lace your chopines. All extant examples and those that I've seen in paintings have two sets of eyelet holes, an inner set and an outer set. Although some extant pieces do not use both sets, it is possible that the lacing either rotted away or was replaced at conservation. The pictorial evidence, however, seems to support this lacing technique. First, start off by placing one of the aglets onto your lacing either by sewing or using a small rivet. I crimped these which I have not seen in any examples, but the eyelet lacing I used was a fine one, and I was concerned that it wouldn't hold up unless I crimped the aglet. Then, put one end into the top corner outer hole and pass it back through the bottom of the inner outer hole. Then, bridge the gap and go into the next inner hole, and back out of the next outer hole. |
 | |
Next, move one row down and do the same as you did before, continuing to the bottom. In this case, since I only had three rows of eyelet holes, to make the lacings end up on the same side, I had to come back up the center one more time, but it is not all that noticeable (this is not shown). |
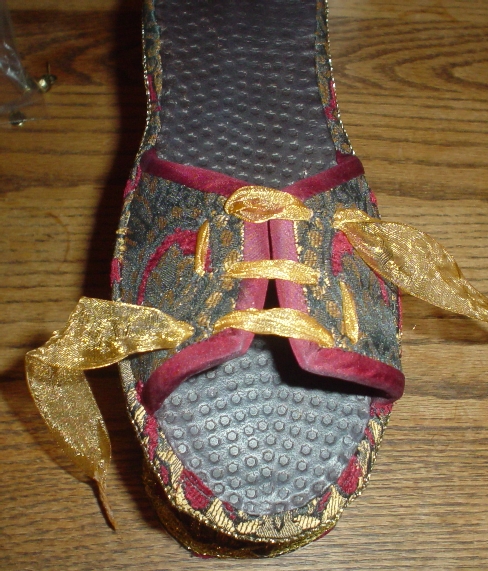 | |
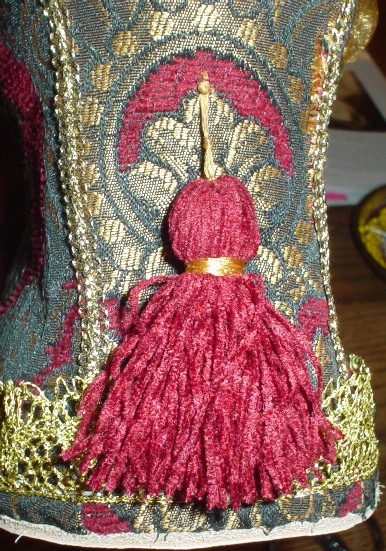
They look so good, I want to leave them as is! But, if you're going to go over the top, let's go all the way! The last step is to add a tassel. |
 | |
Just stitch the tassel using some small stitches to lock it into place. |
 | |
|
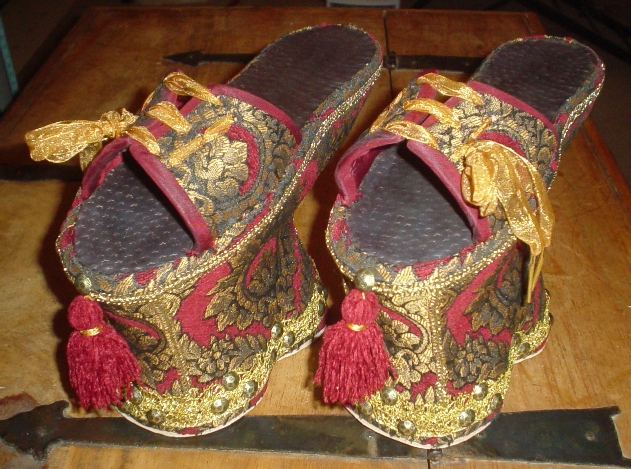
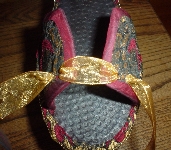
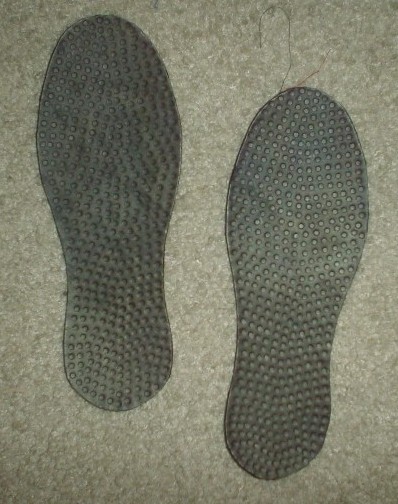
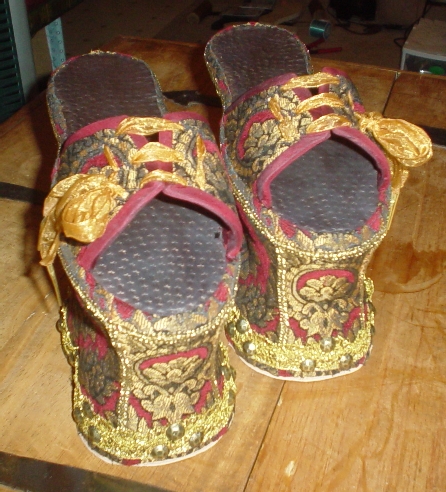
We're done!!! Here is one view of the finished chopines.
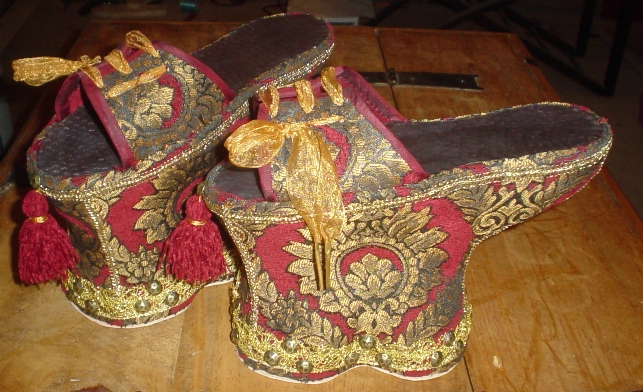
| Here is another view. | |